
No matter how much one wants to observe the many wonders of the universe, it is always a question of time before
thoughts about imaging these same wonders begin to circulate throughtout our mind. Of course, one of the best targets
for someone to get their first taste of astrophotography is the moon by virtue of its brightness (second brightest
object in the sky after the sun and certainly the brightest object in the evening sky) and large apparent diameter
(30 arcminutes). As a result, the moon is not only easy to locate but is easily available for two to three weeks each
month and certainly year-round. Finally, the photography of the moon does not require expensive supplementary
equipment such as high-precision $10,000 german equatorial mounts with sub-arcsecond accuracy when slewing and/or
guiding when, in fact, an alt-azimuth mount or even a tripod will suffice.
Camera Considerations:
During the past five years the field of astrophotography has experienced phenomenal growth and, basically, this is
something that can invariably be traced back to one's ability to take images in digital format which not only allow
for immediate assessment and evaluation but greatly facilitate processing thereafter. To this end, we have at our
disposal classical monochrome (and more recently colour) CCD cameras typically used for DSO imaging, consumer grade
digital cameras with fixed lenses geared at the masses and semi-professional digital equipment with removeable lenses
and a wide suite of features involving ISO, white balance, colour schemes, evaluative metering, exposure compensation
etc. During the past two years, the video webcam has not only proven to be another tool of choice but has become the
weapon of choice for high-resolution lunar, solar and planetary imaging.
Although digital cameras from each of the above four groups can be used for the imaging of the moon, they each have
their associated strengths and weaknesses and the ultimate choice will be dictated by a wide variety of factors.
Dedicated CCD cameras: If you are interested in the highest possible image quality with a
simultaneous ability to have large print capability, these cameras are the weapon of choice. These dedicated cameras
are now available with eleven megapixel arrays (!) (ex. SBIG STL-11000M) which not only allow for widefield imaging
(similar to using 35 mm film) but also permit for large print size reproductions at 300 dpi (ex. for magazines). However,
their main disadvantages when it comes to imaging the moon are their inability to sample at high rates and their
extreme sensitivity to light (they were designed for very faint DSO's!). The current technology is based on USB 1.1
throughput of image files ranging from 3 to 11 Mb and which require anywhere from 3 to 30 seconds to download. As
a result, these cameras are really suitable in situations when the seeing is very good and the astrophotographer has
the luxury of capturing a handful of images knowing that a major proportion of these will be very good for stacking
and consequent processing. In the case of non-interlaced cameras (such as the SBIG ST-7, 8, 9 and 10 series), we also
have a physical limitation of 0.11 sec for the fastest possible exposure which can be problematic when imaging a
very bright object such as the moon. In contrast, interlaced camera (ex. SBIG ST-2000XM and STL-11000M) allow for
exposures as low as 0.001 seconds and where blooming can be eliminated. These dedicated cameras with their relatively
large chips are also wonderful for widefield images of the moon involving, for example, mare, long rilles and
mountain chains etc. Also, it is best to use 1x1 binning as well as a camera with a small pixel size (ex. 7.4 microns)
so as to mitigate further possible issues with blooming. It should be noted that CCD cameras generally provide the
best dynamic range of any of the cameras described in this article and should be used when the seeing permits it.
Consumer digital cameras: The public's embrace of these cameras has been a winfall for all
us by virtue of incessant competitive pricing, thus allowing for a quick and cheap entry into digital astrophotography.
The Nikon Coolpix 990 was perhaps the first consumer digital camera to be used for astrophotography and which opened
the door for a wide variety of digicams intended for the masses to also make their way into astrophotography.
When looking to use a digicam, perhaps the greatest dilemma involves a camera with or without a removeable lens, for
the former are the choice of the masses for general family pictures etc whereas the latter are for the more "serious"
amateur or dedicated professional. Fixed lens cameras invariably require an adapter which usually threads into the
lens itself on one end and allows for the other end to be attached to an eyepiece (or an adapter placing the complete
assembly close to the eyepiece). However, this scenario (afocal photography) has the disadvantage of additional
glass elements in the optical train, a need for macro capability so that the digicam lens can be placed as close to
the eyepiece as possible, possible issues with vignetting (especially at low focal ratios) and glaring as well as
occasional focusing and zoom issues. In contrast, many of these cameras have an LCD which provides for an immediate
and live FOV and which assists in the determination of critical focusing (using optical and digital zoom), framing
etc. Furthermore, these cameras and the afocal mode allow for a wide choice of eyepieces to be used (with and without
reducer/correctors and barlows) which allow for a rich variety of field of views.
Taking the digicam a step further via the purchase of a digicam with a removeable lens (ex. Canon EOS 10d, 20d, 300d),
we are immediately pressed into a situation which allows for prime focus work, thus allowing for the sharpest possible
image and where the telescope becomes the camera's lens. The only additional accessories needed for the mating of
these cameras to the telescope are a t-ring and t-adapter which can be purchased for less than $50 combined. These
cameras also have larger chips, extended exposure capability thus also allowing for DSO work, excellent sensitivity,
low-noise chips, raw image formats and, for some models, autodark subtraction.
Video/Web cameras: Strange as it may sound, the cheapest cameras are also the best when it
comes to imaging the moon (and other members of the solar system). The king of the webcams is the Phillips ToUCam Pro
(740k and 840k models) which is available for less than $100, has a removeable lens and requires a $20 adapter so
that it can be dropped into a star diagonal (I use a black Kodak 35 mm film canister which perfectly doubles for
an adapter and fits perfectly into a 1.25" diagonal). The strength of these web cameras and which pulverizes the more
powerful and expensive CCD and digicams is their ability to continually sample our target of interest so that brief
moments of good and steady seeing are not only captured but are recorded in droves due to the high sampling rate, thus
allowing for a wealth of material to increase the S/N ratio! Who says the brute force method (vis a vis incessant sampling)
is not preferable?!
Although classical webcams can accomodate sampling rates as high as 30 fps, it is adviseable to use either 5 or 10 fps
so as to allow for the passage of the video stream through the USB port in an uncompressed format. When using a higher
frame rate, the bottleneck (the USB port) will necessitate the dropping of frames from the video stream which defeats
the primary advantage of a continuous sampling stream. Two disadvantages associated with webcams are the small pixel
array (640x480) and the rapid consumption of hard disk space (500 kb per frame) and occasional problems with large AVI's
which exceed 2 Gb in size. Similarly, it is strongly advised that the hard disk be defragmented frequently so as to
ensure the least possible delay in the writing of the AVI or, otherwise, the dropping of frames will resurface even at
low (fps) imaging rates.
It should be noted that a "distant cousin" of the webcam has recently surfaced which permits for much higher true
throughput via firewires. These cameras (ex. ATIK and DMK monochrome models) allow for a true 30 fps without any frame
dropping since the firewire ports on laptops and desktop units can accomodate streams up to 400 Mb per second! However,
we are still restricted to a 640x480 pixel array and now a higher cost ($300-$450). A much cheaper alternative with
firewire capability is the Unibrain but some caution is worthy due to compatibility problems with K3CCDTools (image
capture software) and a reported need for reduction frames for the correction of fixed pattern noise and shadows in the
image frames.
Software:
Strange as it may sound, image processing is as important to producing a killer image as is the choice of equipment
for image acquisition and, depending on the camera used, we have a wide variety of tools available to go from one or
more raw images to a final production image outlining one or more salient features of the lunar surface. A list of
my favourate tools is available elsewhere on this website (click here).
Other considerations:
Some common secrets are worthy of mention and reinforcement. The best investment one can make so as to as maximize
their productivity during a session is to spend some quality time in identifying and nailing focus as perfectly as
possible. Although software techniques do exist to make slight improvements in the final image as far as sharpness
is concerned (for example, unsharp masking, Richardson-Lucy deconvolution, Crispen and DDP), one cannot reproduce
something (signal) from nothing (noise) and, as such, critical focusing is vital.
There are various methods one may use to finetune their focus as much as possible and these include Hartmann masks,
maximum pixel value, FWHM, knife-edge focusers, split-screen focusing screens, diffraction spikes and patterns as
well as various motorized software techniques (JMI SmartFocus, RoboFocus, Optec TCF). Since the moon is a relatively
large body mass, some very simple techniques are also very rewarding. A couple of my favourites include the use of
the moon's limb where not only do I seek the sharpest possible limb but also one which is also nicely defined and
contiguous. Also, I look for the smallest possible craters (seeing can impact matters here) and use them to identify
my infocus and outfocus points so that I can interpolate and locate their midpoint which should lie quite close to
the critical focus zone.
Another common secret is to do all imaging with the moon as high in the sky as possible, so that heat currents and
their deleterious effects on image quality are minimized. As a general rule of thumb, I will not waste my time in
trying to image the moon unless it is 45-50 degrees above the horizon and I would be more than happy to wait an extra
hour or two so as to get it directly overhead! Yes, I may have to put myself in a physically awkward position with
my SCT and the overhead moon but a little soreness the following morning will be greatly alleviated by the wonderful
images captured a few hours earlier.
Finally, the use of an IR-Cut (or rejection) filter is a must. When doing CCD imaging, LRGB filters are invariably
IR-blocking and it is easy to overlook or forget this vital prerequisite. However, when using a digicam or webcam,
such a filter is both necessary and vital for the production of better quality photos which restrict light from the
visible spectrum only to pass through and simultaneously help correct for atmospheric turbulence. The filter of choice
is the Baader UV-IR Cut Filter and which sells for approximately $40 new.
Available Shortly |
 |
 |
 |
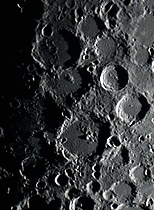
SBIG ST-2000XM Prime Focus (C14) |
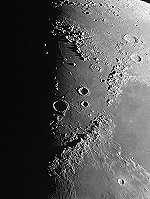
EOS 300d Prime Focus (C14) |
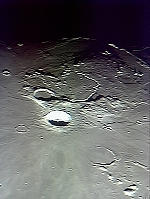
Nikon Coolpix 995 Afocal Projection (C14) |
Philips ToUCam Pro 740k Prime Focus (C14) |
Note: Published in The New Moon (BAA, UK), Dec/2007: 03-06.